The preview we’ve finally been looking for
….is finally here!!

The thing is, it’ll probably be a lot easier than you expected.
Because it’s not that hard at all, my lovelies.
Don’t make it seem too hard la.
Since Thanksgiving Break (hecka yas) starts today, I’m going on a spree of editing and also continuing this series. You guys betta be mudda hypedddd.
I. WHITE AREAS
[gifs]
cr: same friend <333
OPTION 1: THE QUICK SELECT TOOL
**applies for primarily only speech/shock bubbles
I will be showing you two ways in doing this, and the first way is to use the Quick Select Tool.
It’s a bit tedious, in my opinion, but it’s a more “official way” to clean.
Press the Quick Selection Tool button then select the area that you want to remove.

From there:
Go to Edit > Fill
White, not Content-Aware, if you think it’ll be like the last tutorial.


It looks kinda… groce?
What I mean is that the speech bubbles look splotchy and parts of the black lines are taken out. Happens all the time whenever I use this method tbh.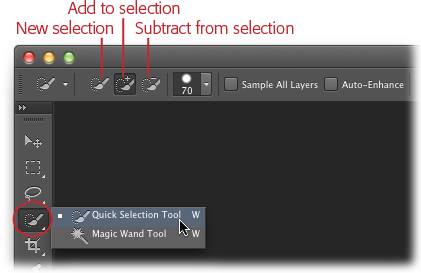
Go back and subtract that whole selection that was generally selected. The whole thing.
When it’s all removed, press Add to Selection to that chunk of words you want to take out. Then, same steps as before, fill it with white. Tadah!
MAKE SURE IT DOES MATCH THOUGH.
Not that bad, but it looks pretty tedious, right? :p

OPTION 2: PAINTING
The ghetto-as-fck option… but probably the most convenient imo.
I hope I don’t have to tell you how to use the Paint tool.
Make the color selection white, and paint over the words. That’s it.
Nothing more to say…
None of this shit, or I’ll hunt you down:

II. NONWHITE BACKGROUNDS
(FOR TRICKY SELECTIONS)
The reason why I made the other tutorial is because it’s a bit harder to comprehend if I put it into just this page.
Too much words -> no comprehend.
This tutorial is most likely the same thing as the one I previously posted with a slight twist. I would typically use this method for if the words are slightly too small and a bit harder to select/use Content-Aware.
On to the show, shall we?

Use the Magic Wand Tool and select the area you want to remove.
Then, press:
Select > Modify > Expand

Edit > Fill > Content-Aware
mudda done.
OR
Using your Healing Brush Tool, press Alt for a few second and let go, so it captures the background.
Then, click and drag your cursor and color that unwanted area out.

OR
I typically use this way since it’s the way that I originally learned it.
I’ve never had to use these options, but it’s better to have a few different ways on how to do this than just one.
First one, I would use for desperate measures, and the second one for if I were lazy and there’s nothing too much going on in the background.
Depends on you guys, really.
Hope it was helpful and not too confusing. Give me your feedback, and what you think I should add to this/do next.
– shiba –

Another simple and easy-to-follow guide. The short clips(?) for each step are extremely helpful in understanding exactly what to do, first time I’ve seen something like that in a tutorial.
Thanks again for making! 🙂
Dylan
LikeLike